My Everyday Makeup Routine + Application Tips and Tricks!
Updated: Aug 6, 2020
I have always LOVED makeup ever since I was a little girl playing with my mom’s eye shadow and lipstick. In high school I was the girl who did all of my friends’ makeup for Prom and Ball! Then after college while I was living in LA, I was a makeup artist for Bobbi Brown and spent many years doing makeup for weddings all over Southern California. Makeup has always been a creative outlet for me and I love enhancing a woman’s own beauty and making people feel good about themselves.
I’ve been getting requests for a blog and tutorial about my daily makeup routine, so I’m sharing my must-have makeup products and favorite application tips with you! I have tried so many beauty products over the years and right now, these are my go-to essentials. This is my quick, everyday makeup look that leaves me feeling fresh-faced and put together!
Foundation
I make sure to use products with SPF every single day to ensure that I’m protecting my skin from the sun’s harmful rays. The two products I have been using in tandem for quite some time now are Elta MD’s Facial Sunscreen SPF 46 and Rodan + Fields Radiant Defense.
Both products are packed with skincare benefits, so they act as makeup and skincare at the same time. What could be better than that?! They each contain SPF and just enough pigment to match and even out my skin tone. Unless I am headed out for a special event or plan to be on-camera, I don’t like to wear heavy makeup during the day. These two products together are the perfect duo since the Elta is more sheer and the R+F has a touch more color. When combined, the two products provide just the right amount of coverage for a very natural looking, glowing foundation. I mix a small pump of the Elta MD with a pea-sized amount of the Rodan + Fields on my fingertips and rub into my face.
Pro Foundation Tips:
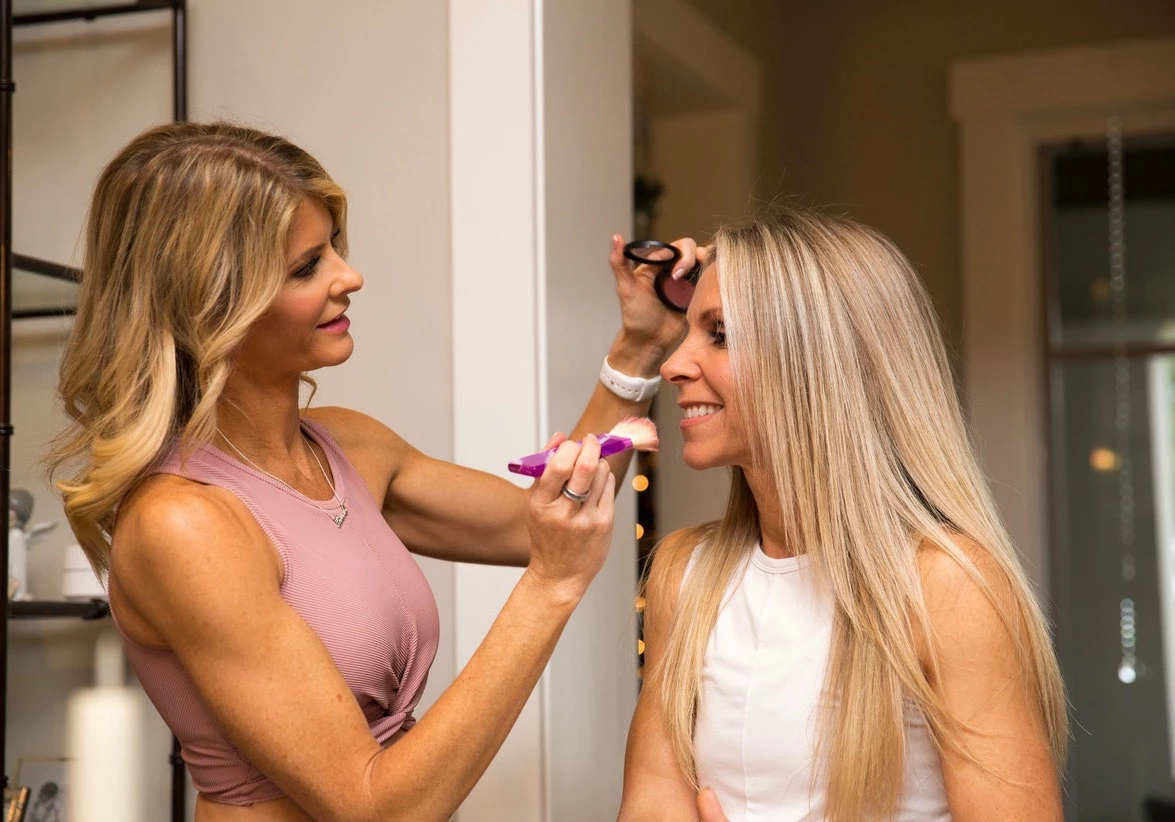
I always prefer to apply foundation with clean fingers, as I find this method blends the product into my skin better and helps it last longer (less product is wasted on a sponge or makeup brush if you just use your hands!). Be sure to gently blend the product all the way under the jawline and into the hairline to avoid any lines.
After applying your foundation, grab a Beauty Blender (it is a must in every girl’s makeup bag!) and dampen it with a little bit of water and squeeze out the excess. I find that a slightly damp sponge works best to blend foundation into the skin. Then use the Beauty Blender all over your face, be sure to dab, not swipe - paying close attention to the jawline. This extra step with the Beauty Blender will flawlessly blend your foundation, making it look like your skin, just enhanced!
* Remember: You want your skin to look like SKIN, not a face caked with makeup! That old school heavy matte foundation look is so outdated!

Links:
Elta MD Broad-Spectrum Facial Sunscreen: https://amzn.to/396qF7i
Rodan + Fields Radiant Defense: https://www.rodanandfields.com/shop/radiant-defense-perfecting-liquid-spf-30-cream/p/DERDH01
Beauty Blender: https://amzn.to/2O3qu37
Concealer
I’ve used a lot of concealers, but NOTHING compares to Tarte Shape Tape. I seriously could not live without this product! It comes in 30 different shades, doesn’t crease, and stays in place all day long - even when I’m LEVELING UP! I apply the concealer in a “C”- shape under each eye and use the tip of my damp Beauty Blender to blend into the skin and the rest of my foundation.
Pro Concealer Tip: Dab the concealer all the way into the inner-corner of the eye and up into your lower lash line. Take any excess onto the eyelid to create an eyeshadow base! Remember, you can’t dab too much ~ It helps blend everything together!

Tarte Shape Tape
I linked my color in Light Medium, but make sure you select a color to match your skin tone!
Translucent Setting Powder
Next, I use RCMA No-Color Powder to set my foundation and concealer. This affordable setting powder disappears into the skin helping to set your foundation and concealer for all-day wear.
Pro Translucent Powder Tip: I use a small, soft, puffy brush when working with this product so I can be more targeted with my application. When using powder to set your foundation, focus mainly on your T-zone and under-eye area.

Link: RCMA No-Color Powder:
Bronzer, Blush & Highlighter
This is one step I never skip! I am loving the Tarte Clay Play Eye & Cheek Palette. It’s a one-stop-shop for bronzer, blush, highlighter, and eyeshadow. I’m a firm believer that everyone can (and should!) use bronzer, no matter your skin tone. It warms up the skin and gives you a beautiful glow, especially perfect for Summertime! I use a big, flat, wide brush and dip it into the bronzer, tapping off the excess. Apply your bronzer wherever the sun would naturally hit your skin: On the cheekbones, across the temples, the bridge of the nose, and the chin.
Pro Bronzer Tip: Don’t forget to apply a bit of bronzer to the front of the neck and under the jawline to blend everything together. Remember, you can never blend too much!
Next, I apply my blush. I do this like a Nike swoop, swirling my brush at the apple of my cheek and swooping it back and up towards my temple. Blush is so important to make our cheeks pop and help us look alive, happy, and fresh!
From here, I take a small amount of highlighter on a light, poofy brush and lightly apply it to the tops of my cheekbones. Who doesn’t love a little shimmer to highlight those cheekbones!?

Tarte Clay Play Eye & Cheek Palette Vol. II
Brows
Your eyebrows frame the eye area and are such an important feature on our face that should appear well-groomed. I’ve finally found an eyebrow product that I absolutely love and that saves me time! Anastasia Tinted Brow Gel saves me SO much time and creates the illusion of thicker, fuller brows. Just take the brush (similar to a mascara wand) and feather the product along your natural brow line. You can also use this to fill in wherever your brows are lacking in growth.
Pro Brow Tip: If you like a darker brow or if you’re going for a more dramatic night-time look, just use a little more pressure when applying or dip the brush again for more product!

Anastasia Tinted Brow Gel:
Eyeshadow
Back to my trusty Tarte Clay Play Palette! I use a small, flat brush to apply one of the lighter colors as a base for my eyeshadow, laying this color over the entire eyelid, all the way from the lash line to the brow bone. Make sure to get into the inner-corner, too!
Next, I use a small, pointed, soft brush to define my crease, I usually mix a few of the darker colors in the palette. Be sure to tap off the excess product to avoid fallout! I apply these shades in a windshield-wiper motion right into my crease to add definition. I find it helps to angle my head back in the mirror when applying this step, as it really pronounces the crease and makes my eyes pop! I focus on the outer edge of my lid to make my eyes look bigger and more lifted.
From there, I take a fluffier brush in a shade a little bit lighter and apply this in the same windshield wiper motion to blend everything together!
Pro Eyeshadow Tip: Try using a wide, fan-shaped, feathery brush to swipe away any excess product that may have fallen under the eyes during application.
Eyeliner
Bobbi Brown eyeshadow in the shade Espresso is my everyday go-to for liner. I used to be a makeup artist for Bobbi Brown and have been using this shadow as my everyday liner for 18 years! It’s SO easy to apply and looks natural for daytime use. I use a small, narrow, flat brush to apply the product into my upper and lower lash lines, using small, feathery strokes. Wing the product up into the corner of the upper lid crease for a more dramatic look- I find that this also helps to open up the eyes! You can go in as heavy or as light as you want! Again, use that fan brush to lift away any residual product.
Pro Eyeliner Tip: If you’re going for the look of liquid eyeliner or want something more dramatic for a night out, try getting your brush wet before applying!

Bobbi Brown Eyeshadow - Espresso
Mascara
No makeup look would be complete without mascara! Before applying, I curl my lashes, getting as close to the lash line as possible (I find that this makes a HUGE difference!). I swear by my Chanel Inimitable Intense Mascara. I use the shade Noir and I love the definition and volume it gives to my lashes. Try tilting your head back when applying mascara. You want to focus on placing most of the product at the base of the lash line and then with a jiggling motion, pull the brush up towards the end of your lashes. Then, I take the brush on the top of my lashes too to coat both sides. I use the remainder of the product left on the brush and lightly apply it to my lower lashes for added definition. Lashes for dayyys!
Pro Mascara Tip: When applying your mascara, be sure to twirl the brush in the bottle instead of pumping it to avoid air getting into the tube. This will keep your mascara from drying out and will help it last longer!

Chanel Inimitable Intense Mascara
Lips
I’m sure you can already sense this about me but I am a HUGE pink girl! Especially when it comes to lip color and I’ve found a combo that I’m loving right now: Charlotte Tilbury Lipliner in the shade Pillow Talk paired with Chantecaille Lipstick in the shade Gypsy Rose. I highly recommend Pillow Talk as it is a universally flattering shade and wears beautifully! I apply my lip liner with tiny, feathery strokes, rather than drawing a long line around the edge of my lips. Next, I apply my lipstick, and I’m good to go! When it comes to lip color, go with whatever your vibe is! You do YOU and have fun with it!
Pro Lip Tip:
If you want your lip products to last a little longer, make sure to fill in the entire lip with your liner first before applying lipstick.

Charlotte Tilbury Lipliner - Pillow Talk
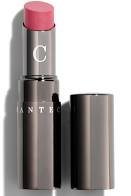
Chantecaille Lipstick - Gypsy Rose
Brush Recommendations
There are SO many brushes out there, but I’ve found that NYX is a great, cost-effective brand and Bobbi Brown is my fav for a more luxury brush.
Try out these makeup products and let me know what you think! What are your favorite makeup must-haves? I‘d love to hear! I am always on the lookout for new makeup!
Make sure to check out my Everyday Makeup Tutorial on LEVEL UP Online for a step-by-step tutorial video with everything included in this blog!